
Disclaimer: This post is for educational purposes only. It does not contain affiliate links. All information is based on personal experience and research. I have no financial relationship with any platform or service mentioned in this article.
When I first created my Fiverr account, I did something that cost me three weeks of visibility.
I signed up in a hurry, skipped half the profile sections because they felt optional, uploaded a blurry photo I cropped from a group picture, and published my first gig without filling in my skills or description properly.
The account worked, technically. I could log in, I had a profile, and my gig was live. But it looked exactly like what it was: an account someone had thrown together in twenty minutes without thinking about it.
Buyers can tell. The algorithm can tell too.
The good news is that creating a Fiverr account the right way doesn’t take much longer than doing it wrong. It’s the same signup process; you just make deliberate choices at each step instead of clicking through as fast as possible.
This guide walks you through every step, including the parts most tutorials skip over because they seem minor but actually matter quite a bit.
Before you start, two things are worth deciding first
1. Are you signing up as a seller, a buyer, or both?
Fiverr allows one account to function as both buyer and seller. Most people creating an account to offer services still use the same account to buy services when they need them. That’s completely fine and very common.
What you cannot do is create multiple accounts. Fiverr’s terms of service are strict on this: one account per person, period. If you’ve ever made a Fiverr account before, even years ago, log into that one instead of creating a new one. Duplicate accounts get both suspended.
2. What username do you want?
Your Fiverr username becomes part of your permanent profile URL, fiverr.com/yourusername, and cannot be changed once set. Take sixty seconds to think about this before you sign up.
Use something clean, professional, and ideally relevant to the kind of work you plan to do. Avoid random numbers, underscores, or anything that looks like a temporary handle. “tahasohail” or “tahadesigns” is better than “taha_2947_official.”
If your preferred username is taken, try a variation that still looks intentional. Buyers do look at your profile URL; it’s a small but real trust signal.
Step 1: Go to Fiverr.com and click “Join”
Go to fiverr.com on a desktop browser if possible. The signup process works on mobile too, but completing your profile fully is easier on a larger screen.
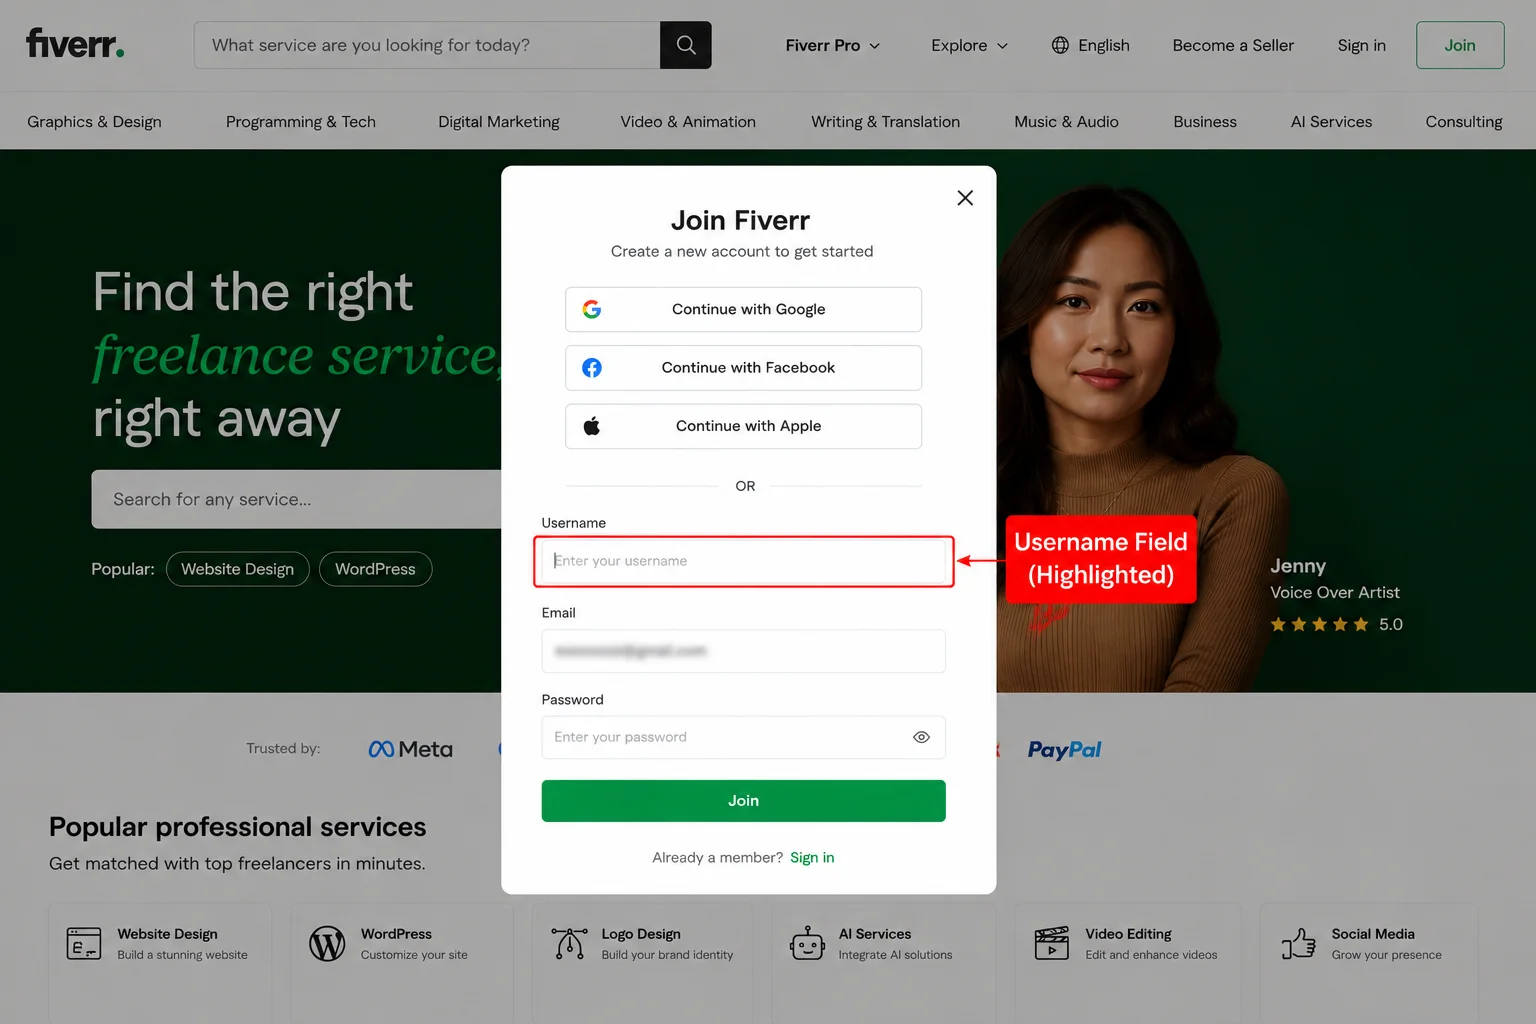
Click the “Join” button in the top right corner of the homepage.
You’ll see three signup options:
- Continue with Google
- Continue with Facebook
- Sign up with email

My recommendation: use your email address. Not because Google or Facebook signup is broken, it works fine, but because linking Fiverr to your personal Google or Facebook account creates a dependency. If you ever change your Google account or lose Facebook access, your Fiverr login becomes complicated. A standalone email and password keep things simple and independent.
Use a professional email address for this. A Gmail you check regularly and that has your actual name in it is better than a nickname or an old account you barely open. Fiverr sends important notifications, payment confirmations, and order alerts to this email. You need to actually see them.
Step 2: Set your username and password
After entering your email, Fiverr will ask you to choose a username and create a password.
Remember what I said earlier about the username. Take your time here. Once confirmed, it cannot be changed.
For your password, use something genuinely strong. Fiverr accounts that get compromised are painful to deal with, especially if you have pending orders or earnings sitting in your account. Use a combination of letters, numbers, and symbols, and don’t reuse a password you’re already using elsewhere.
A password manager like Bitwarden (free) or the one built into Google Chrome can generate and store secure passwords without you having to remember them.
Step 3: Verify your email address
Fiverr will send a confirmation email immediately after signing up. Open your inbox, find the email from Fiverr, and click the verification link.
If you don’t see it within two minutes, check your spam or junk folder. It almost always arrives quickly; if it hasn’t, spam is the first place to look before clicking “resend.”
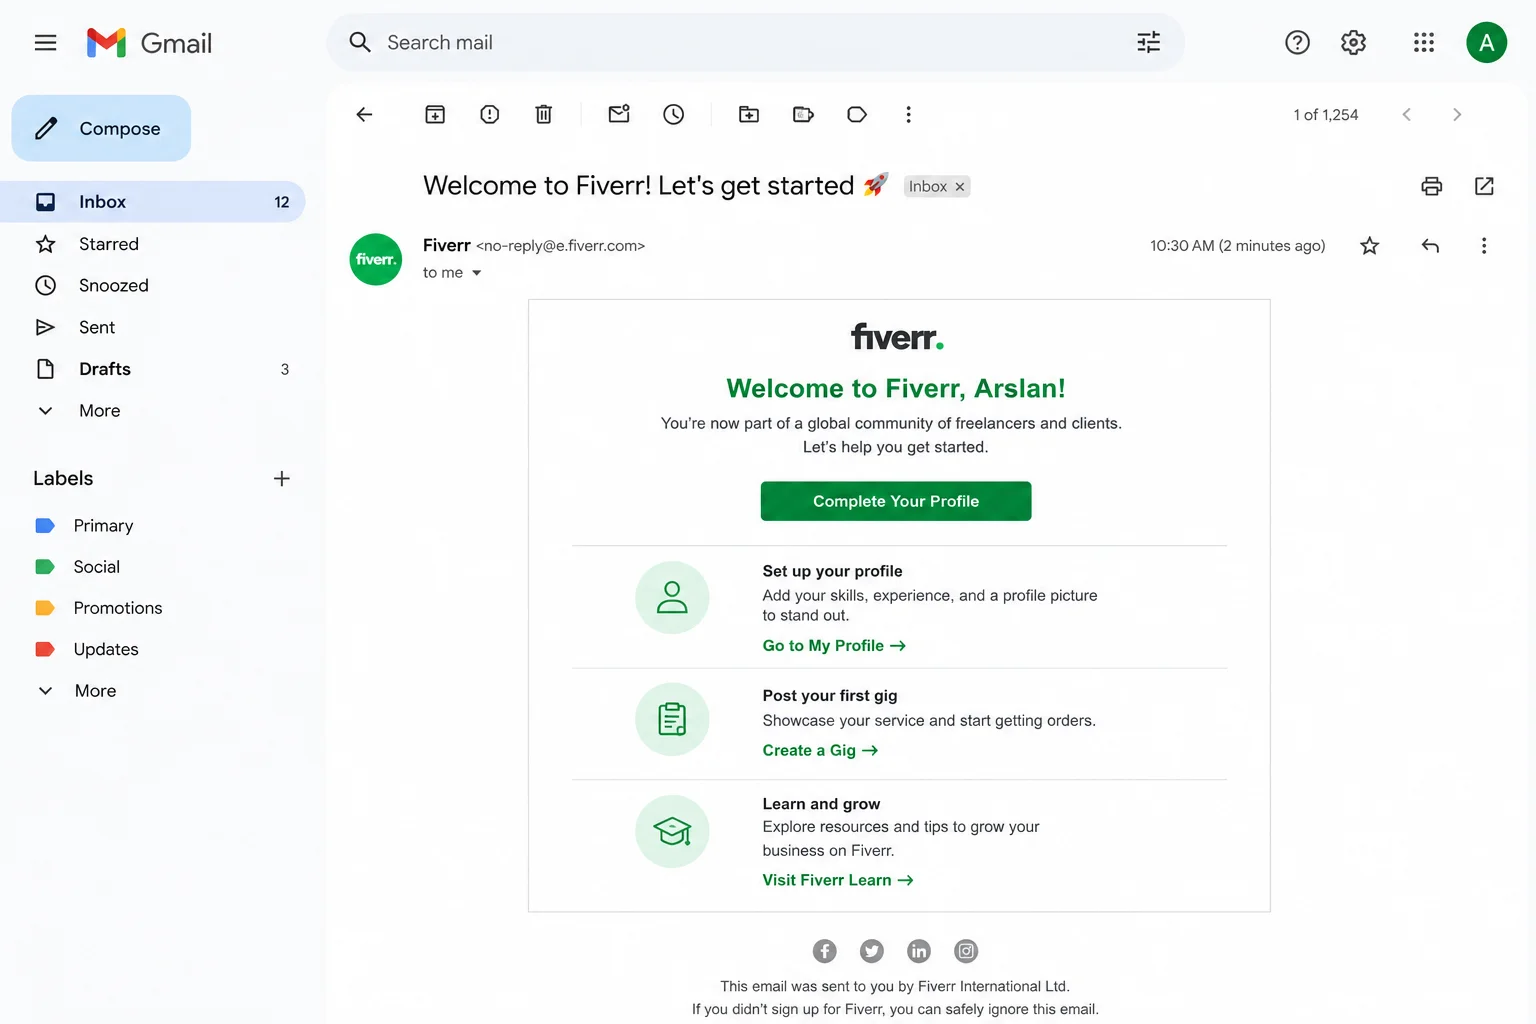
You cannot publish gigs or place orders until your email is verified. Don’t plan to come back to this step later, do it right now while you’re still in the flow of setting up your account. The verification link expires, and coming back to find it’s no longer valid is an annoying interruption when you’re trying to get started.
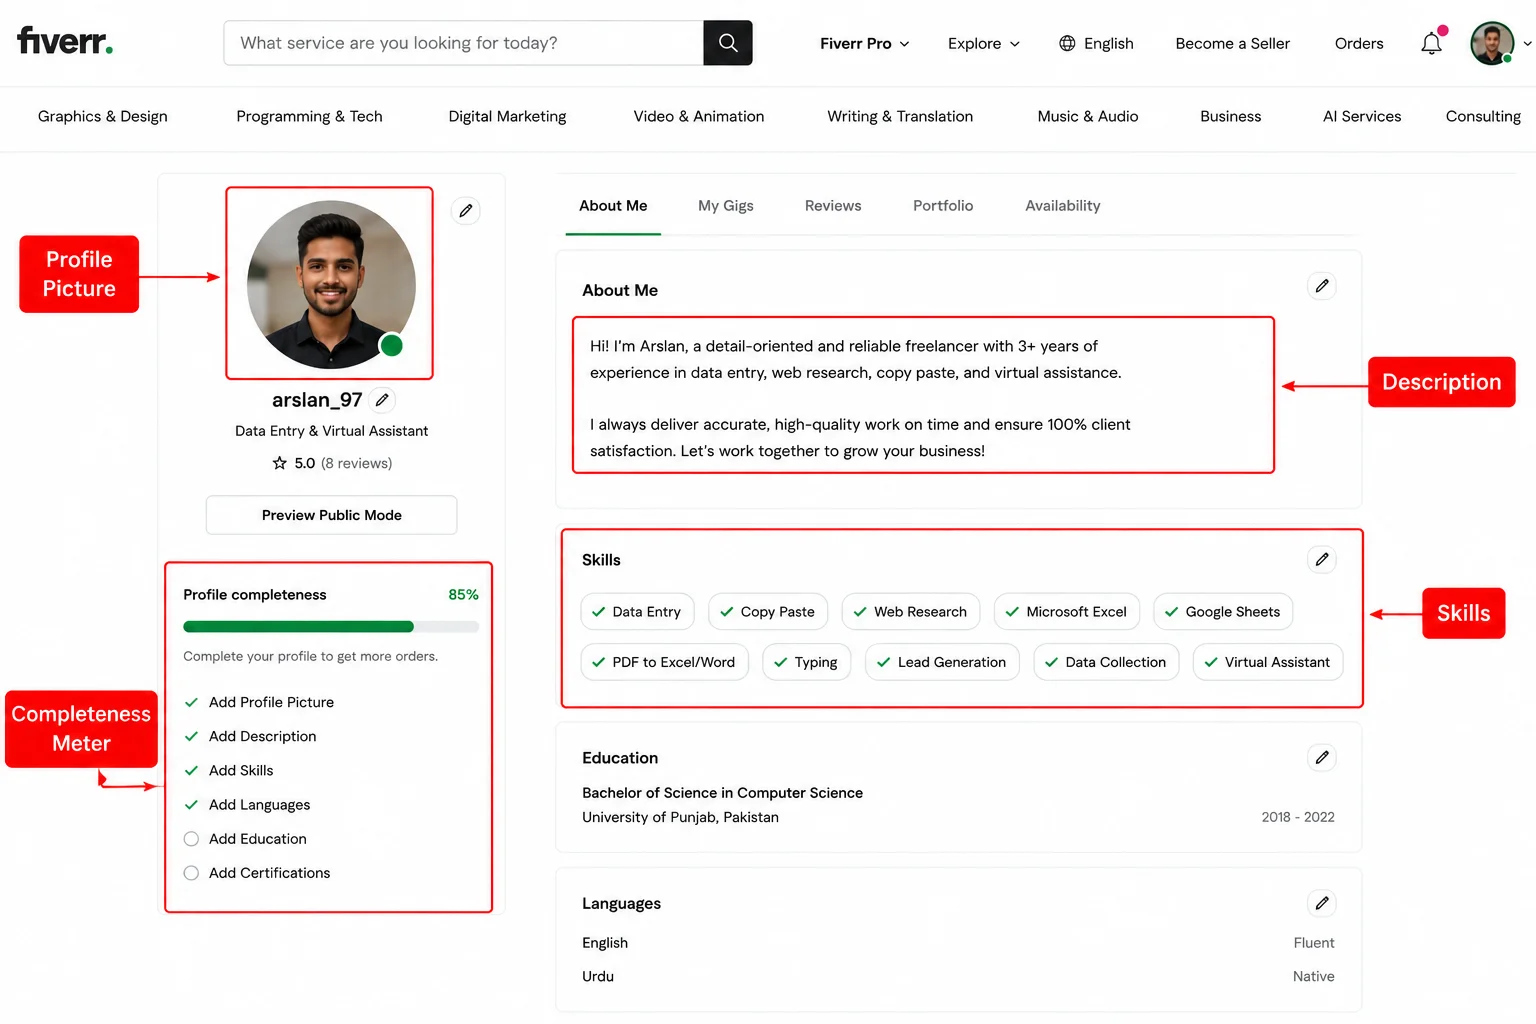
Step 4: Complete your profile, every section
This is the step where most new sellers lose ground without realizing it.
Fiverr shows a profile “completeness” indicator for sellers. More importantly, buyers who visit your profile before ordering are silently evaluating everything they see. An incomplete profile, missing photo, blank description, empty skills section, is a quiet trust killer even before they read your gig.
Here’s what to fill in, and how to do each one well:
Profile photo
Use a real photo of your face. Not an avatar, not a logo, not a cartoon, a clear, well-lit headshot where your face is visible and you look like someone a buyer would feel comfortable trusting their work to.
You don’t need a professional photographer. Stand near a window for natural light, use your phone camera, and take a few shots. Pick the one where you look approachable, and the background isn’t distracting. Crop it to a square.
The difference between a profile with a real face and one with a placeholder is significant in terms of buyer trust. I tested this myself, the same gig with an actual headshot got noticeably more clicks than when I had used a generic icon.
Display name
This is the name shown publicly on your profile. It can be your real name or a professional name; either is fine. Just make it something you’d be comfortable having associated with your work, and that looks like a real person’s name rather than a screen handle.
Profile description
Write two to three short paragraphs about yourself: who you are, what you offer, and why you take your work seriously.
Don’t write a formal biography. Write the way you’d introduce yourself to someone at a professional event, conversational, specific, and genuine. Mention what you’re good at, what kinds of buyers you work well with, and something brief about your background that gives context.
Avoid vague phrases like “I am a passionate professional dedicated to delivering excellence.” Every seller writes that. Nobody believes it. Be specific instead: “I’ve been doing data entry and document formatting for two years. I’m fast, accurate, and I respond to every message within an hour.”
Skills
Fiverr gives you a skills section where you can add up to fifteen relevant tags. Fill this in accurately and completely. These help Fiverr categorize your profile and surface you in relevant searches beyond just your gig keywords.
If you’re offering data entry services, add skills like “Data Entry,” “Google Sheets,” “Microsoft Excel,” “Web Research,” and any others that genuinely apply. Don’t pad this with skills you don’t actually have; buyers sometimes ask about them directly.
Languages
Add every language you speak at a functional level. Fiverr has a large global buyer base, and many buyers actively prefer sellers who can communicate in their language. Each language you list is an additional audience that can find and engage with your profile.
Education and certifications
Add your education, even if it’s not directly related to your service. A buyer seeing that you’re enrolled in or have completed a degree shows you’re a real person with a real background. If you’ve completed any online certifications, from Google, Coursera, or Fiverr Learn, add those too. They fill out the profile and signal someone who takes their development seriously.
Step 5: Set up your seller profile specifically
After completing the general profile, Fiverr will guide you through a seller-specific setup when you click “Become a Seller.”
This section asks about your professional experience, linked accounts, and certifications. Fill it in honestly, same principles as the profile description. Specific and genuine beats vague and inflated every time.
You can link external social media accounts here. LinkedIn is worth adding if your profile is reasonably professional. A personal website, if you have one, adds credibility. These external links signal to buyers that you exist as a real person beyond Fiverr, which is a meaningful trust signal for first-time buyers who are still deciding whether to take a chance on a new seller.
Step 6: Verify your phone number
Fiverr requires phone verification for sellers. Go to your account settings, find the security section, and add your phone number. You’ll receive a verification code by SMS.
This step is required to publish gigs. Don’t plan to do it later, you’ll hit this wall the moment you try to go live with your first gig and have to stop mid-process to complete it anyway.
It also adds real security to your account. Verified accounts are harder to compromise, and Fiverr treats them with slightly higher internal trust as a result.
Step 7: Connect your payment method
Before you can withdraw earnings, you need a payment method connected to your account. Fiverr supports several options depending on your location:
- PayPal: Works in most countries globally
- Payoneer: The most practical option for sellers in Pakistan, India, and much of South Asia, where PayPal has limitations
- Bank Transfer: Available in select regions
- Fiverr Revenue Card: A prepaid card option for those who prefer it
For Pakistani sellers, Payoneer is the standard and most reliable route. If you don’t have a Payoneer account, sign up at payoneer.com separately, get verified (this can take a few days), and then link it to your Fiverr account.
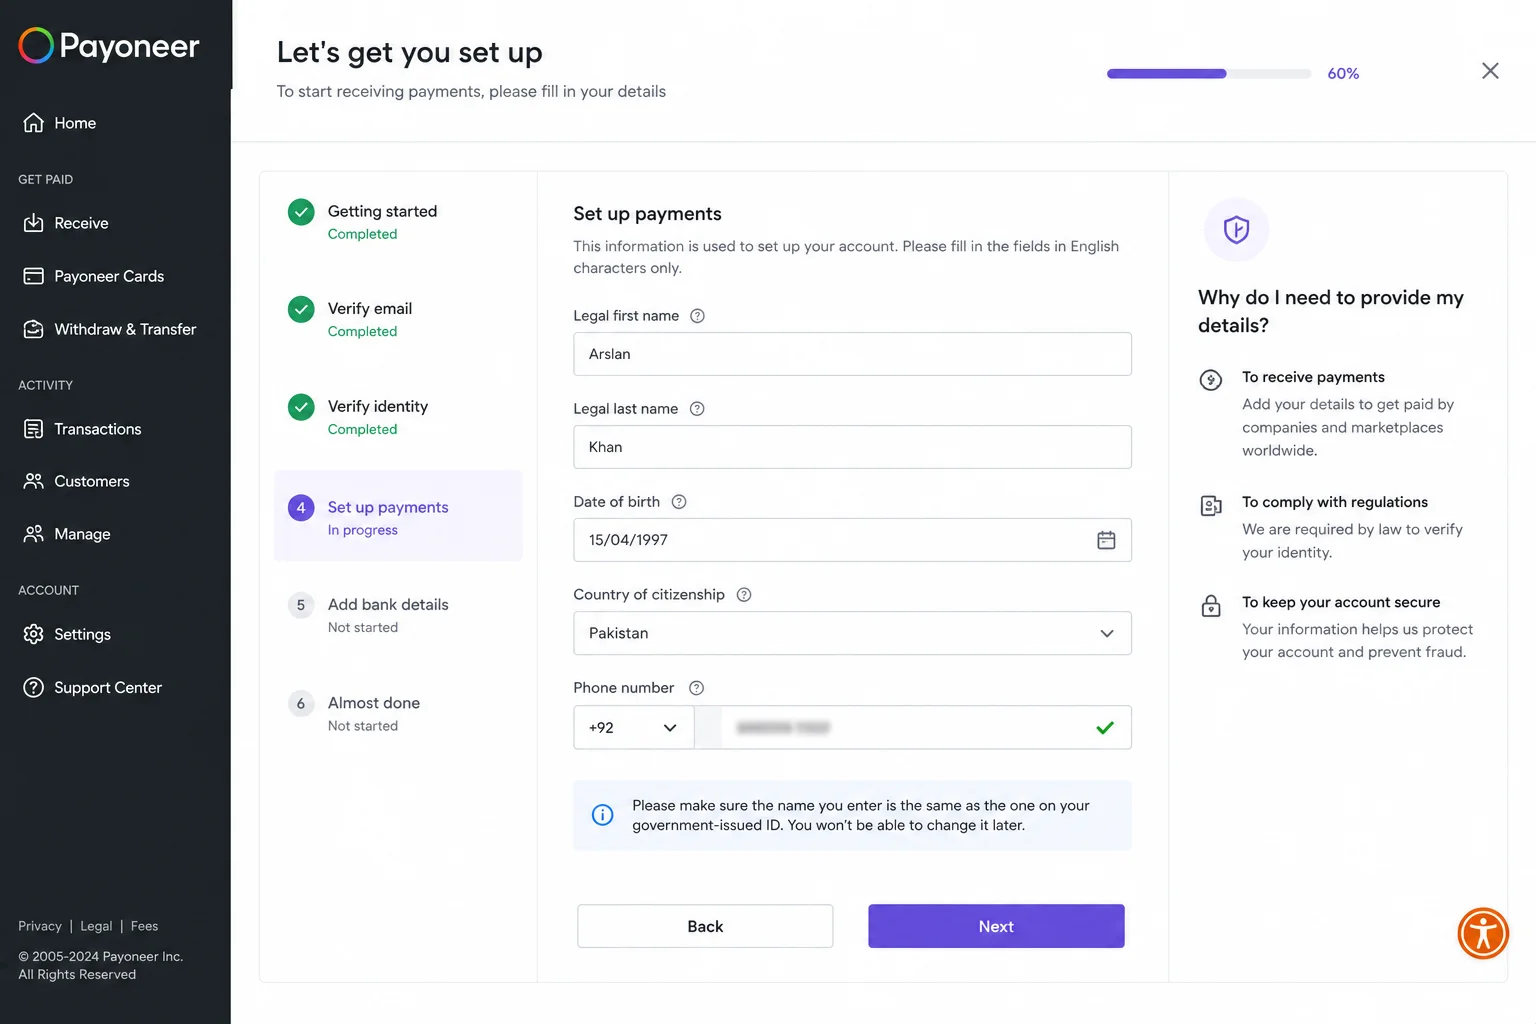
You don’t need this in place before your account is set up, but get it sorted before your first order comes in. Fiverr holds earnings for a 14-day clearance period after order completion. You want your withdrawal path ready before that clock starts, not after, because nothing is more frustrating than having money in your account that you can’t access. After all, you skipped a setup step.
The mistakes I made, and see new sellers repeat constantly
Choosing a username without thinking it through. Names like “bestgig786” or “profreelancer_official” look like placeholder accounts, not professionals. Your username is permanent. Treat it like a business name.
Using a blurry, cropped, or unclear profile photo. I used a photo where I was barely distinguishable because I cropped myself out of a group photo. It looked bad. A proper headshot takes five minutes to take with a phone camera. There’s genuinely no reason to skip it.
Leaving the profile description empty or writing pure filler. “I am a hardworking freelancer who gives 100%” tells a buyer nothing useful. Write something specific that tells them who you are and what you’re good at.
Not verifying the email address immediately. The verification link expires. Some people sign up, get distracted, and come back later to find the link no longer works. They have to request a new one and interrupt their setup momentum. Verify the email before you close your browser.
Setting up the payment method only after the first completed order. Payoneer verification takes a few days for new applicants. If you start that process after your first order completes, you’re waiting unnecessarily to access money that’s already yours. Set it up during the account creation process.
Treating the profile as a formality to get past. The profile isn’t the preamble to the real work; it IS part of the real work. Buyers look at it before every order. A strong profile converts gig visitors into actual buyers. A weak profile sends them to someone else. Forty-five minutes spent on the profile properly is the highest-return investment you’ll make when starting.
Once your account is fully set up
Creating your Fiverr account properly puts you in a completely different position than sellers who rushed through it.
Your profile now works for you passively; every buyer who finds one of your gigs and clicks through to your profile sees a complete, trustworthy presence. That’s the difference between a buyer thinking “this person seems legit” and a buyer bouncing back to search results.
From here, the next step is creating your first gig, with the same level of deliberate care you put into the account itself.
The foundation is set. Now build on it.
Taha Sohail is a blogger and cyber engineer who writes about freelancing, online earning, and digital skills at Skillzoid.com.
Related reading: How to Get Your First Order on Fiverr Fast (2026 Guide) | How to Earn Money on Fiverr Without Any Skill (Beginner’s Guide 2026) | Best Fiverr Services to Sell and Make Money in 2026


2 Comments on “How to create a Fiverr account step by step (2026 guide)”